How to install SSL certificate on IIS 7?
Install to Web Server
1. Open Internet Information Services Manager (IISM) to the appropriate Server Start -> Administrative Tools -> IISM -> Server Name
2. Open the Server Certificates icon.
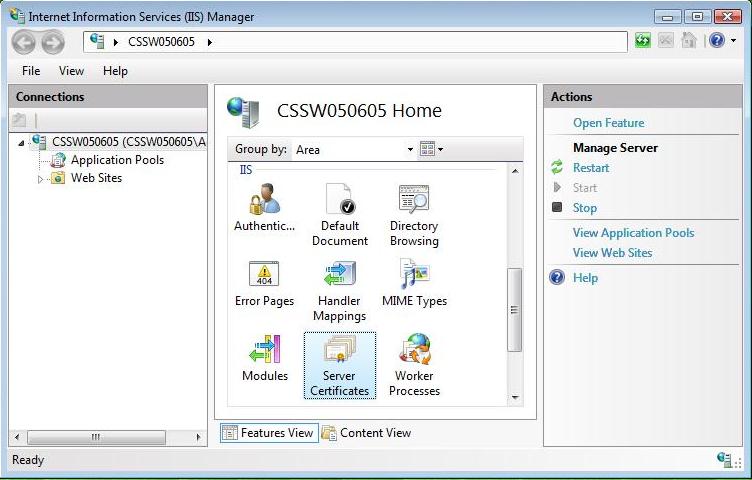
3. Open 'Complete Certificate Request' Wizard
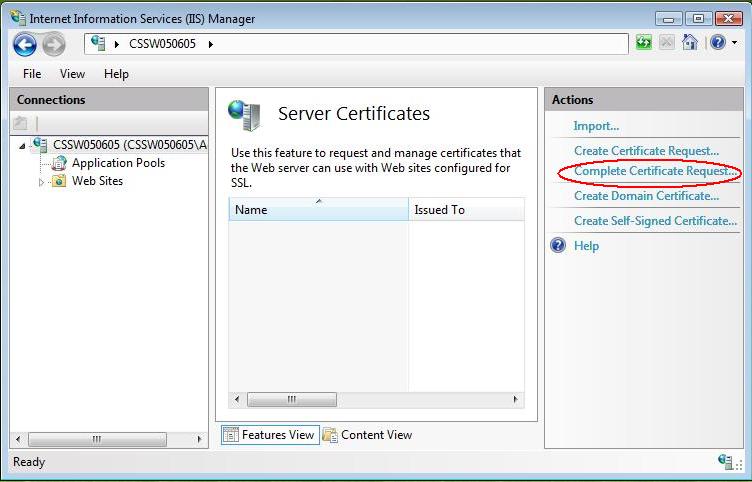
From the 'Actions' Menu on the left select 'Complete Certificate Request'
4. Proceed to Complete Certificate Request' Wizard
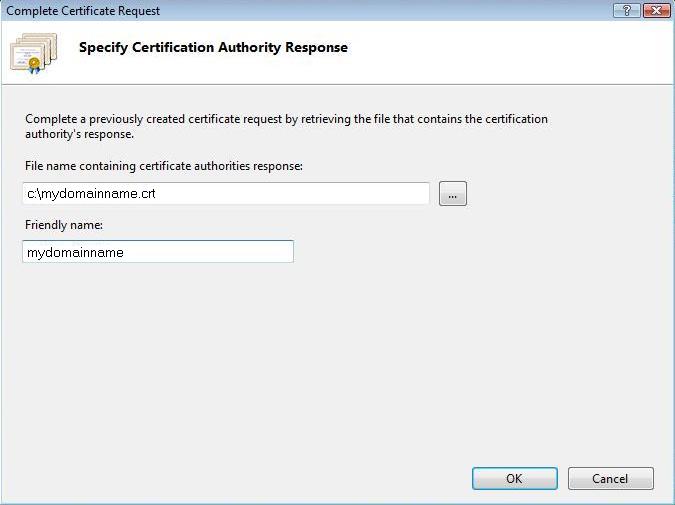
Fill out all appropriate information. You can find the CRT file in the e-mail, sent by Sectigo. You can also obtain the CRT file from your Dashboard at ClouDNS. The file name will include your domain name with .crt suffix (e.g. example.com.crt). You may need to browse to the location of the certificate or you may enter it in the provided box. The friendly is not part of the certificate itself, but is used by the server administrator to easily distinguish the certificate.
Note: There is a known issue in IIS 7 giving the following error: "Cannot find the certificate request associated with this certificate file. A certificate request must be completed on the computer where it was created." You may also receive a message stating "ASN1 bad tag value met". If this is the same server that you generated the CSR on then, in most cases, the certificate is actually installed. Simply cancel the dialog and press "F5" to refresh the list of server certificates. If the new certificate is now in the list, you can continue with the next step. If it is not in the list, you will need to reissue your certificate using a new CSR (see our CSR creation instructions for Windows).
Assign to Website
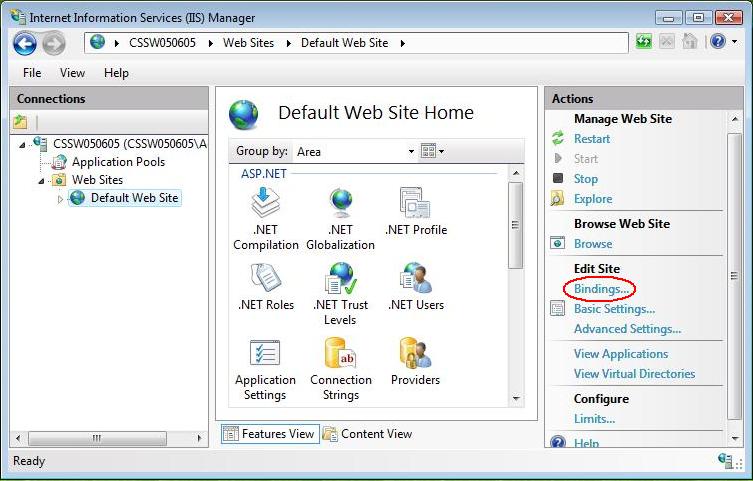
1. Navigate back to the root of the appropriate website. The center of the window should say "Default Website Home" or whatever the name of the website is.
2. Select 'Bindings' from the 'Edit Site' sub menu.
3. Add Port 443
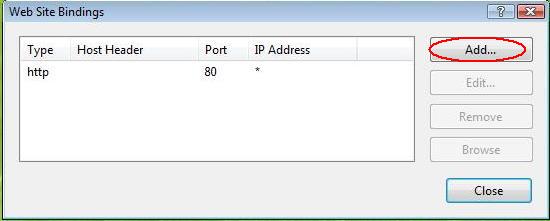
In the 'Site Bindings' window, click 'Add'.
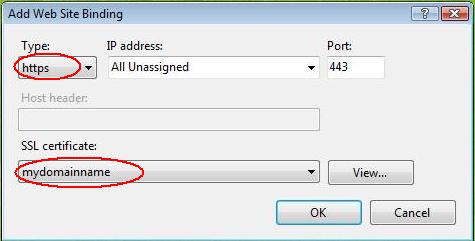
This will open the 'Add Site Binding' window. Under 'Type' choose https. The IP address should be the IP address of the site or All Unassigned, and the port over which traffic will be secured by SSL is usually 443. The 'SSL Certificate' field should specify the certificate that was installed using the above steps.
Click 'OK' to save changes.
Note: There may already be an 'https' entry in this area. If so, click 'https' to highlight it. Then click 'Edit' and in the 'SSL certificate' area select the friendly name that was generated earlier. Click 'OK' to save changes.
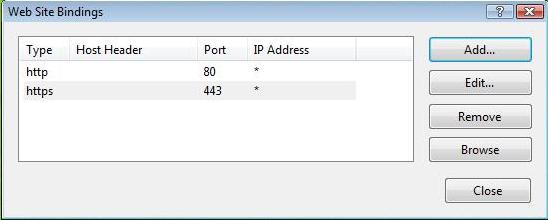
Click 'OK' on the 'Web Site Bindings' Window to complete the install.
Important: You must now restart IIS / the website to complete the install of the certificate.
Single SSL on multiple servers
These days it often happens to have multiple web servers for a single web page. If this is your case, you do not have to buy an SSL certificate for each server. You can use one single SSL certificate for all of them. To do it, you have to install the Private Key from the web server, on which CSR was generated and the certificates sent by Sectigo on each web server. Have in mind, that if you are using Wildcard SSL certificate, the CSR must be generated with Wildcard. For example, if you will generate a CSR for Wildcard SSL certificate for domain name domain.com, the CSR must be generated for *.domain.com.
SSL Certificate Disappears from the Certificate List on IIS
Issue
After installing an SSL certificate on your IIS server, it may disappear from the list of available certificates or fail to show up in the IIS bindings. This issue can prevent you from using the SSL certificate to secure your website, leading to errors when attempting to enable HTTPS.
Cause
Several common reasons can cause an SSL certificate to disappear from the list in IIS:
- Missing Private Key: Certificates without an associated private key will not be usable by IIS. If the certificate is imported incorrectly or the .pfx file does not include the private key, it will not appear in IIS.
- Incorrect Certificate Store: If the certificate is imported into the wrong store (e.g., Trusted Root Certification Authorities instead of Personal), IIS will not be able to find or use it.
- Permission Issues: If the IIS application pool identity does not have sufficient permissions to access the certificate’s private key, the certificate might not be usable or may seem to disappear.
- Expired or Revoked Certificate: An expired or revoked SSL certificate may disappear from the list of available certificates in IIS as it is no longer valid.
Resolution
Follow these steps to resolve the issue and ensure that your SSL certificate is properly imported and available for use in IIS:
- Check the Certificate in the Certificate Store
- Open mmc.exe (Microsoft Management Console).
- Go to File > Add/Remove Snap-in….
- Select Certificates and click Add.
- Choose Computer account > Local computer and click Finish.
- Navigate to Personal > Certificates and ensure your SSL certificate is listed there with a private key icon (small key symbol).
If the certificate is missing or lacks a private key, proceed to the next steps.
- Import the Certificate with the Private Key Using IIS Manager
- Open IIS Manager on your server.
- In the Connections pane, select your server.
- Double-click Server Certificates in the Features View.
- Click Import… in the Actions pane.
- Select your .pfx file containing the SSL certificate and private key.
- Enter the password associated with the private key.
- Ensure the option Mark this key as exportable is checked.
- Click OK to import the certificate.
This ensures that the certificate is imported correctly with the private key, making it usable for IIS.
- Verify Permissions on the Private Key
- If the certificate is still not appearing, you may need to adjust the permissions on the private key.
- Open mmc.exe and navigate to Personal > Certificates.
- Locate your SSL certificate, right-click on it, and select All Tasks > Manage Private Keys….
- Ensure that IIS_IUSRS or Network Service has Read access to the private key.
Adjusting these permissions ensures that IIS has access to the private key needed to use the certificate.
- Restart the IIS Service
- After making changes, restart IIS to apply them:
Open Command Prompt as an administrator.
Run the following commands:
iisreset /stop
iisreset /start
- This will stop and restart the IIS service, ensuring that all SSL configuration changes take effect.
- After making changes, restart IIS to apply them:
- Reinstall the SSL Certificate if Necessary
- If the SSL certificate continues to disappear, remove it from the certificate store and reinstall it.
- Export the certificate from its original source, ensuring that the .pfx file includes the private key.
- Use the IIS Manager to import the .pfx file as described in step 2.
This process ensures that the certificate is correctly re-imported and appears in the IIS bindings.
Additional Tips
- Use .pfx files for importing SSL certificates whenever possible, as these include the private key necessary for IIS to use the certificate.
- Check for any error messages in the Event Viewer under Windows Logs > Application to find more details about certificate import issues.
- Ensure that your server's date and time settings are accurate, as incorrect settings can cause SSL certificates to be considered invalid.
Conclusion
By following the above steps, you should be able to resolve issues with SSL certificates disappearing from the list in IIS. Properly importing the certificate with its private key and ensuring correct permissions are crucial for successful SSL configuration in IIS.
Last modified: 2024-10-14